Extend the Season: Cold Frames and Row Covers 101
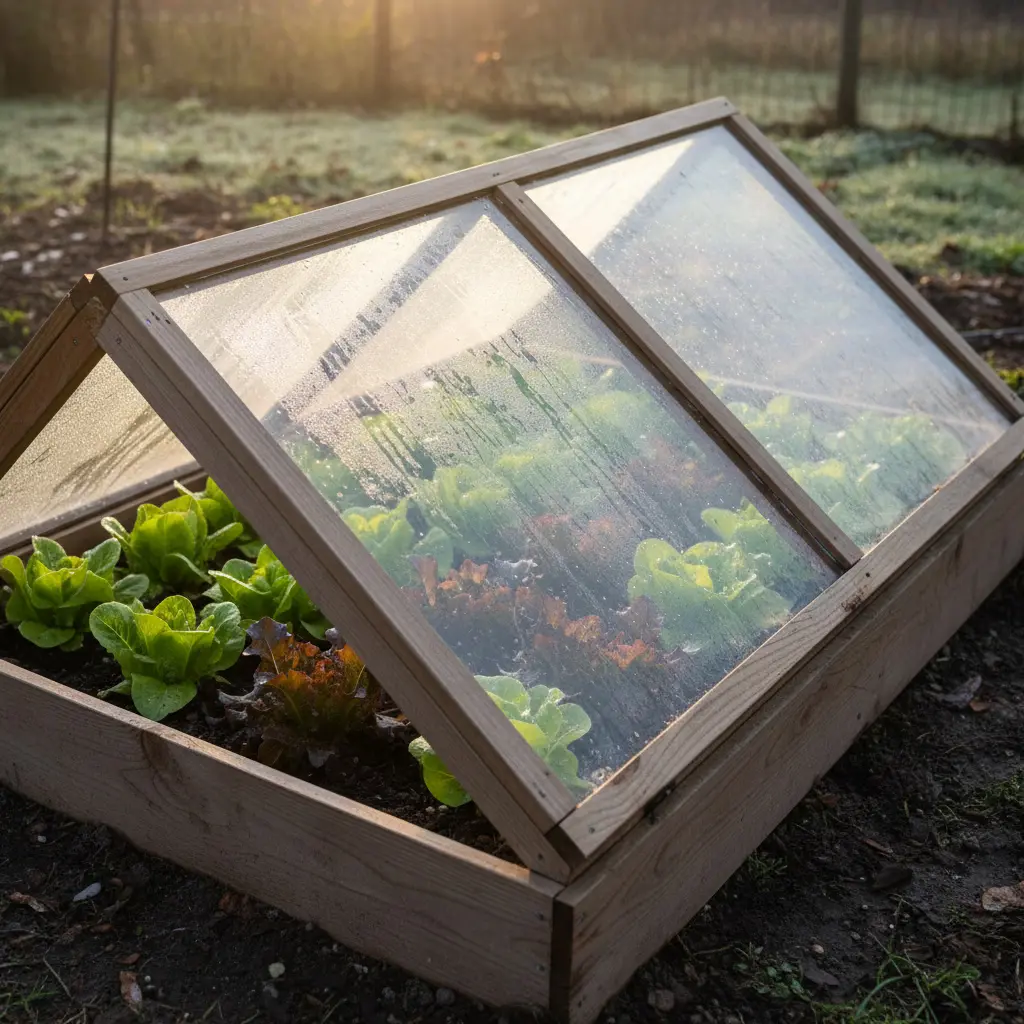
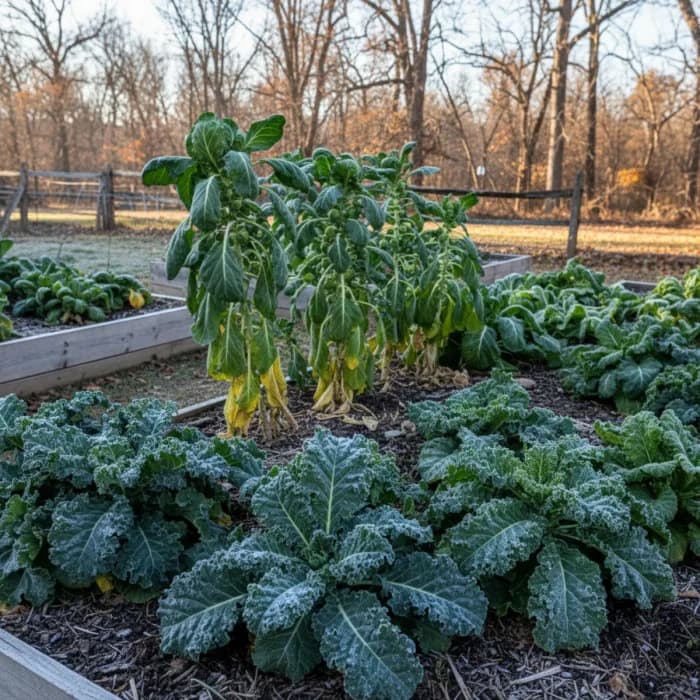
October arrives with its familiar rhythm: gardeners harvesting the last tomatoes, pulling spent plants, and closing garden chapters until spring’s return. But in scattered yards across cold climates, a different story unfolds. Under glass covers and white fabric tunnels, lettuce grows crisp and sweet, spinach thrives in near-freezing temperatures, and carrots develop sugar-enhanced flavor that only comes from cold-weather growing.
Season extension isn’t about fighting winter—it’s about understanding how simple protection can create microclimates that extend productive growing by weeks or months. Cold frames and row covers work with natural physics, trapping solar energy and creating pockets of warmth that let cold-hardy crops continue growing long after unprotected gardens succumb to frost.
The Science Behind Season Extension
How Protection Creates Growing Zones:
Heat Capture and Retention:
- Clear covers trap solar radiation during day
- Thermal mass (soil, water, stones) stores heat for nighttime release
- Insulation barriers slow heat loss to atmosphere
- Wind protection reduces convective heat loss
- Ground warmth maintains root zone temperatures
Microclimate Creation:
- 5-15°F temperature increase inside protection
- Higher humidity levels support plant processes
- Reduced wind stress allows continued photosynthesis
- Protected environment extends active growing temperatures
- Gradual temperature transitions reduce plant shock
Light Management:
- Quality covers transmit 80-95% of available light
- Diffused light reaches plants from multiple angles
- Extended daylight capture in shorter winter days
- UV transmission maintains plant health processes
- Reduced glare stress in intense conditions
Temperature Zone Shifting: Effective season extension moves your garden 1-2 USDA hardiness zones warmer. Zone 5 gardeners can grow Zone 6-7 crops with proper protection, extending seasons from October into December and starting earlier in February-March.
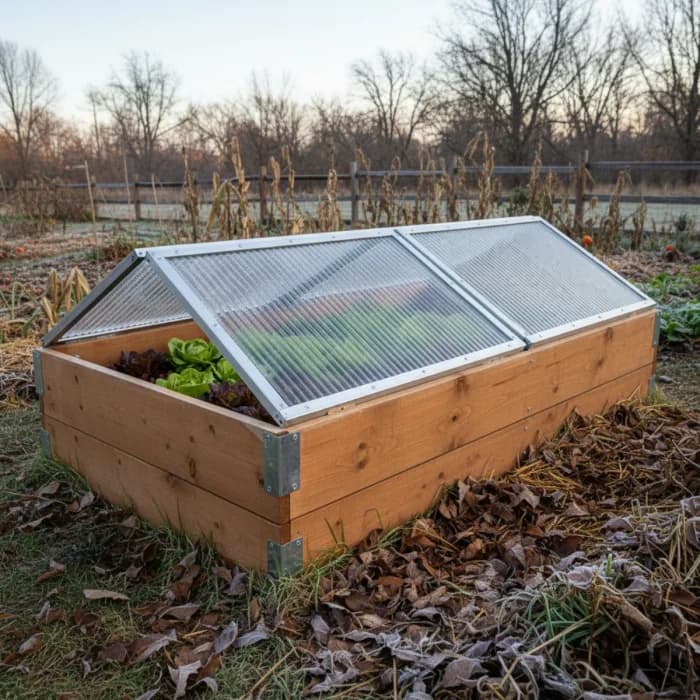
Cold Frames: The Season Extension Workhorse
Understanding Cold Frame Principles
Basic Physics:
- Slanted glazing maximizes solar gain during low winter sun angles
- Insulated sides retain captured heat
- Thermal mass in base stores heat for nighttime release
- Ventilation system prevents overheating on warm days
- Weather-tight construction blocks wind and precipitation
Optimal Positioning:
- South-facing exposure for maximum solar gain
- Protection from north winds with walls or fencing
- Slight slope for drainage and sun exposure
- Access to water source for irrigation
- Convenient location for daily monitoring
Cold Frame Construction Options
Permanent Masonry Frames:
- Materials: Concrete blocks, stone, brick
- Glazing: Double-wall polycarbonate, tempered glass
- Size: 3x6 feet typical for family use
- Advantages: Maximum heat retention, permanent installation
- Investment: $300-800 depending on materials
Wooden Frame Construction:
- Materials: Cedar, redwood, or pressure-treated lumber
- Glazing: Old windows, polycarbonate sheets
- Size: Customizable to available space
- Advantages: DIY-friendly, moderate cost, attractive appearance
- Investment: $150-400 for materials
Portable/Temporary Frames:
- Materials: PVC pipe, aluminum angle, lightweight lumber
- Glazing: Plastic sheeting, lightweight panels
- Size: Various, often smaller for mobility
- Advantages: Seasonal use, storage flexibility, lower cost
- Investment: $50-200 for basic systems
Professional Cold Frame Design
Frame Dimensions:
- Depth: 18-24 inches (front to back)
- Height: 6-8 inches front, 12-18 inches back
- Width: 3-4 feet for easy access
- Slope: 15-30 degree angle on glazing
Ventilation Systems:
- Automatic openers: Temperature-activated pistons
- Manual props: Adjustable support arms
- Ventilation timing: Open at 70-75°F, close at 55-60°F
- Side vents: Additional air circulation options
Insulation Strategies:
- Base insulation: Rigid foam around exterior walls
- Thermal mass: Water jugs, concrete blocks, stones inside frame
- Night covers: Blankets, rigid foam panels for extreme cold
- Ground warmth: Compost pile heat, buried water barrels
Row Covers: Flexible Season Extension
Types of Row Cover Materials
Spun-Bonded Fabric (Floating Row Covers):
- Material: Polypropylene or polyester fibers
- Weight: Light (0.5 oz/sq yd) to heavy (2.0 oz/sq yd)
- Temperature protection: 2-8°F depending on weight
- Light transmission: 70-85%
- Advantages: Breathable, allows rain through, lightweight
Clear Plastic Covers:
- Material: Polyethylene film, various thicknesses
- Temperature protection: 5-10°F boost
- Light transmission: 90-95%
- Advantages: Maximum heat gain, excellent visibility
- Disadvantages: Requires ventilation, condensation issues
Greenhouse Film and Rigid Panels:
- Material: UV-stabilized polyethylene, polycarbonate
- Temperature protection: 8-15°F boost
- Light transmission: 80-90%
- Advantages: Durable, excellent insulation
- Use: Permanent or semi-permanent installations
Row Cover Installation Techniques
Support Systems:
- Wire hoops: 6-10 feet apart, 18-24 inches high
- PVC pipe: Lightweight, easy to work with
- Galvanized wire: Rust-resistant, professional appearance
- Bamboo stakes: Natural, biodegradable option
Anchoring Methods:
- Sandbags: Reusable, adjustable weight
- Landscape pins: Secure, low-profile attachment
- Board weights: Temporary, easily removable
- Buried edges: Permanent installation method
Ventilation Management:
- End openings: Allow air circulation on warm days
- Side lifting: Partial removal during temperature spikes
- Automatic systems: Temperature-controlled opening mechanisms
- Manual monitoring: Daily temperature checks and adjustments
Crops That Excel Under Protection
Cool-Season Vegetables
Leafy Greens (Excellent performers):
- Spinach: Thrives in 20-40°F range, sweetens with cold
- Lettuce: Butterhead and romaine varieties best for winter
- Kale: Extremely cold-hardy, improves with frost exposure
- Arugula: Fast-growing, self-seeding under protection
- Mache (Corn salad): Specialty green that loves cool weather
Root Vegetables:
- Carrots: Develop enhanced sweetness in cold storage
- Radishes: Quick-growing, continuous harvest possible
- Turnips: Both roots and greens useful
- Beets: Storage roots plus fresh greens
- Parsnips: Best after frost exposure for flavor development
Herbs for Winter Harvest:
- Parsley: Biennial, continues growing with protection
- Cilantro: Prefers cool weather, bolts less under cover
- Chives: Perennial, provides fresh harvest through winter
- Sage: Evergreen herb, good cold tolerance
- Thyme: Mediterranean herb that appreciates protection
Advanced Season Extension Crops
Asian Greens:
- Bok choy: Fast-growing, cold-tolerant
- Mizuna: Japanese mustard green, very hardy
- Tatsoi: Rosette-forming Asian green
- Komatsuna: Japanese spinach mustard
- Shanghai bok choy: Tender variety for protected growing
Microgreens and Sprouting Seeds:
- Pea shoots: Continuous harvest from successive plantings
- Sunflower greens: Quick-growing, high nutrition
- Radish microgreens: Spicy flavor, fast germination
- Broccoli microgreens: Dense nutrition, easy to grow
Timing Strategy: Plant cold-hardy crops 4-6 weeks before your average first hard frost. This gives plants time to size up before growth slows, then protection maintains them through winter. Spring crops can start 4-6 weeks before last frost under protection.
Building Your First Cold Frame
Weekend DIY Cold Frame Project
Materials List:
- 4 pieces 2x8 lumber, 8 feet long
- 1 old window or polycarbonate panel
- 2 hinges and screws
- Automatic vent opener (optional but recommended)
- Wood screws, corner brackets
- Exterior wood stain or paint
Step-by-Step Construction:
Step 1: Frame Assembly
- Cut lumber: 2 pieces at 36”, 2 pieces at 32”
- Create slanted frame: front 6”, back 12”
- Assemble with corner brackets and screws
- Sand rough edges, apply exterior finish
Step 2: Glazing Installation
- Measure frame opening precisely
- Install hinges on back edge of frame
- Mount glazing to hinges with appropriate hardware
- Test opening and closing operation
Step 3: Ventilation Setup
- Install automatic opener on glazing
- Calibrate opening temperature (70-75°F)
- Test operation with warm water if needed
- Add manual prop as backup system
Step 4: Site Preparation
- Choose south-facing location
- Level ground or build level base
- Position for easy access and monitoring
- Add thermal mass (stones, water jugs) inside
Advanced Cold Frame Features
Thermal Mass Integration:
- Water storage: 1-gallon jugs painted black for heat absorption
- Stone walls: Flagstone or fieldstone inside frame perimeter
- Concrete blocks: Thermal mass that doubles as plant support
- Compost heat: Fresh compost pile beneath frame for bottom heat
Insulation Upgrades:
- Side walls: Rigid foam insulation on exterior
- Night covers: Reflective blankets for extreme cold protection
- Ground barriers: Insulation beneath frame to prevent heat loss
- Draft sealing: Weather stripping around glazing edges
Row Cover Systems and Techniques
Low Tunnel Construction
Basic Hoop House:
- Materials: 10-gauge galvanized wire or PVC pipe
- Spacing: Hoops every 4-6 feet along bed
- Height: 18-24 inches for most crops
- Cover: Spun-bonded fabric or plastic film
Installation Process:
- Bed preparation: Level, weed-free, ready for planting
- Hoop installation: Push 6 inches deep on each side
- Cover attachment: Drape over hoops, secure edges
- Access planning: End openings or removable sections
Ventilation Management:
- Temperature monitoring: Daily checks during variable weather
- Gradual adjustment: Partial opening before full removal
- Seasonal transition: From heavy covers to light as weather warms
- Plant adaptation: Allow gradual exposure to prevent shock
Multi-Season Row Cover Strategy
Fall Protection (September-November):
- Light covers for frost protection
- Easy removal for harvest access
- Focus on extending harvest season
- Prepare for winter transition
Winter Growing (December-February):
- Heavy covers for sustained protection
- Emphasis on maintenance rather than growth
- Limited harvest of mature plants
- Protection from ice and snow damage
Early Spring (March-May):
- Medium-weight covers for growth promotion
- Earlier planting under protection
- Transition to uncovered growing
- Hardening off process for transplants
Advantages
- Extends growing season by 4-8 weeks or more
- Provides 5-15°F temperature protection
- Enables winter harvest of fresh vegetables
- Protects plants from wind, hail, and pests
- Allows earlier spring planting
- Improves crop quality and flavor
- Reduces water loss through evaporation
- Creates opportunities for succession planting
Drawbacks
- Requires initial investment in materials
- Needs daily monitoring during variable weather
- Limited to cold-hardy crop varieties
- Ventilation management can be tricky
- May create pest and disease issues if poorly managed
- Snow load can damage lightweight structures
- Access for harvest can be inconvenient
- Storage required for seasonal equipment
Advanced Season Extension Techniques
Combining Protection Methods
Layered Protection:
- Cold frame inside unheated greenhouse
- Row covers over plants inside cold frame
- Multiple row cover layers for extreme cold
- Thermal mass plus insulation for maximum protection
Heat Source Integration:
- Compost heat: Active compost piles generate 90-140°F
- Solar collectors: Heat-absorbing materials that release warmth
- Thermal battery: Large water containers for heat storage
- Ground warming: Buried hot water systems
Succession Planting Under Protection
Continuous Harvest Strategy:
- Plant new crops every 2-3 weeks
- Stagger varieties with different maturation times
- Use fast-growing crops for quick turnover
- Plan harvests to maintain continuous production
Space Efficiency:
- Intensive planting in protected spaces
- Vertical growing with trellises and supports
- Succession planting in same space
- Interplanting compatible crops
Maintenance and Management
Daily Management Routines
Temperature Monitoring:
- Check internal temperatures daily
- Adjust ventilation based on weather forecasts
- Monitor soil temperature for root health
- Record data for future season planning
Watering Considerations:
- Reduced water needs under protection
- Avoid overwatering in enclosed spaces
- Water early in day to prevent disease
- Monitor soil moisture regularly
Pest and Disease Prevention:
- Good air circulation prevents fungal issues
- Regular inspection for pest problems
- Remove diseased plants promptly
- Sanitize tools between protected areas
Seasonal Maintenance Tasks
Fall Setup:
- Clean and repair protection structures
- Install thermal mass and insulation
- Plant winter crops under protection
- Prepare backup heating systems
Winter Management:
- Remove snow load from structures
- Monitor for ice damage
- Harvest crops regularly to maintain production
- Plan spring crop transitions
Spring Transition:
- Gradual removal of protection
- Hardening off process for tender plants
- Equipment cleaning and storage
- Assessment of season’s success
Troubleshooting Common Issues
Overheating Problems
Symptoms:
- Wilted plants during warm days
- Rapid growth followed by stress
- Condensation buildup under covers
- Plants growing too tall for protection
Solutions:
- Install automatic ventilation systems
- Use lighter-weight row covers
- Create end openings for air circulation
- Monitor weather forecasts for temperature spikes
Insufficient Protection
Symptoms:
- Frost damage despite protection
- Slow or stopped growth
- Plants showing cold stress signs
- Ice formation inside protection
Solutions:
- Add thermal mass for heat storage
- Use heavier-weight covers
- Install night insulation systems
- Combine multiple protection methods
Moisture Management Issues
Fungal Disease Development:
- Improve air circulation
- Avoid overhead watering
- Remove affected plants immediately
- Increase ventilation on humid days
Dry Conditions:
- Install drip irrigation under covers
- Add mulch to retain soil moisture
- Monitor soil conditions regularly
- Water early in day for best uptake
Economic Analysis of Season Extension
Cost-Benefit Breakdown
Initial Investment:
- Basic row covers: $50-150
- DIY cold frame: $100-300
- Professional cold frame: $300-800
- Advanced systems: $500-1,500+
Annual Returns:
- Extended harvest value: $200-500
- Earlier spring production: $100-300
- Reduced grocery costs: $300-800
- Plant protection benefits: $50-200
Break-Even Timeline:
- Simple systems: 1-2 seasons
- Advanced systems: 2-4 seasons
- Professional installations: 3-5 seasons
Value Beyond Economics
Quality of Life Benefits:
- Fresh vegetables through winter
- Earlier spring garden productivity
- Expanded crop variety possibilities
- Reduced dependence on grocery stores
- Educational value for family members
Gardening Skill Development:
- Understanding of plant physiology
- Weather pattern observation skills
- Season planning and management
- Problem-solving for plant protection
- Advanced gardening technique mastery
Planning Your Season Extension System
Assessment and Goal Setting
Evaluate Your Needs:
- Which crops do you most want to extend?
- What’s your available space for protection?
- How much time can you dedicate to management?
- What’s your budget for initial investment?
- What are your long-term gardening goals?
Site Analysis:
- Available south-facing space
- Wind protection and exposure
- Access to water and electricity
- Drainage and soil conditions
- Integration with existing garden layout
Implementation Strategy
Phase 1: Basic Protection
- Start with simple row covers
- Learn temperature management
- Experiment with cold-hardy crops
- Develop daily monitoring routines
Phase 2: Permanent Structures
- Build or purchase cold frames
- Install automatic ventilation
- Add thermal mass and insulation
- Expand crop variety and seasons
Phase 3: Advanced Systems
- Multiple protection zones
- Heat source integration
- Year-round production planning
- Specialized crop focus
Your Season Extension Journey
Season extension transforms gardening from a seasonal hobby into a year-round relationship with food production. It connects you more deeply with weather patterns, plant physiology, and the remarkable adaptability of well-chosen crops. Most importantly, it provides the satisfaction of harvesting fresh, homegrown vegetables when most gardens lie dormant under snow.
The techniques aren’t complicated, but they do require attention and adaptation to your specific conditions. Start simple with row covers or a basic cold frame, learn how plants respond to protection, and gradually expand your season extension systems as experience builds confidence.
Winter harvests taste different from summer abundance—carrots develop complex sweetness after frost exposure, spinach grows dense and flavorful in cool conditions, and lettuce maintains crisp freshness that disappears in summer heat. These crops reward the effort of protection with flavors impossible to buy in any store.
Your season extension success will be measured not just in weeks added to the growing season, but in the quiet satisfaction of stepping into your garden on a snowy December morning to harvest fresh salad greens for dinner. This is gardening that works with winter rather than surrendering to it—extending not just the season, but your connection to the land and the deep pleasure of homegrown food.
Ready to design a season extension system that works for your garden and climate? Try Gardenly’s season extension planner to calculate your frost dates, select appropriate crops, and create a custom protection schedule based on your local conditions and gardening goals.
Sources & Further Reading
- Extending the Growing Season: Start Early, End Later — University of Minnesota Extension
- Season Extenders and Growing Fall Vegetables — Penn State Extension
- Extending the Growing Season in Your Garden — University of Minnesota Extension