Grow Lights for Seed Starting: Everything You Need to Know
Ask any experienced seed-starter what single thing improved their results the most, and the answer is almost always the same: grow lights. The jump from window-sill seedlings to light-grown seedlings is dramatic—the difference between pale, stretched, floppy plants that struggle to survive transplant, and stocky, dark green plants that hit the garden running.
Natural light through a window in January or February is rarely enough, even from a south-facing window. Days are short, sun angles are low, and glass filters out some of the wavelengths plants most need. Grow lights solve all of this.
What Plants Actually Need from Light
Plants use specific wavelengths of light for photosynthesis. The two most important ranges:
Blue light (400-500nm): Drives vegetative growth—leaf and stem development. Blue light keeps plants compact and leafy. This is what seedlings need most.
Red light (600-700nm): Drives flowering and fruiting. Needed for mature plants to bloom, but less critical for seedlings.
Full-spectrum light covers both ranges and more, mimicking natural sunlight. This is what you want for seed starting.
Light is measured in several ways:
- Lumens: Total light output (a human-centric measure—less useful for plants)
- PAR (Photosynthetically Active Radiation): Light usable by plants for photosynthesis
- PPFD (Photosynthetic Photon Flux Density): PAR per square meter per second—the most useful measure for growing
For seed starting, you want roughly 200-400 PPFD. Mature fruiting plants (tomatoes, peppers in their full production phase) need 400-600+ PPFD, but seedlings need less.
Types of Grow Lights
LED (Recommended for Most Gardeners)
Modern LED grow lights are the best choice for most home seed starters. They run cool (no heat stress on nearby seedlings), use significantly less electricity than fluorescent or HID alternatives, and last for tens of thousands of hours.
What to look for:
- Full-spectrum output (listed as 4000-6500K color temperature, or explicitly described as full-spectrum)
- Reasonable PPFD output for the coverage area (check product specs)
- Simple on/off or timer-compatible switching
Types within LED:
Shop lights: These are not marketed as grow lights, but T8 LED shop lights (4-foot, 4000-5000K) work very well for seed starting and cost $20-35. Many experienced seed-starters use these exclusively. Hang them 2-4 inches above seedlings and run them 16 hours per day.
Dedicated LED grow lights: More expensive, marketed specifically for plants. Many include the full red-blue spectrum. Useful if you’re growing mature fruiting plants or microgreens, but not necessary for starting seeds.
LED grow panels: Flat panels, often with adjustable spectrum or intensity. Good for larger setups.
T5 Fluorescent (Still Excellent)
High-output T5 fluorescent fixtures have been the standard seed-starting light for decades. They produce good, even light and are available from most garden and hydroponic suppliers. A 4-foot T5 fixture with two or four bulbs provides very good light intensity for a standard seed tray.
The downsides compared to LED: they run warmer, use more electricity, and the bulbs need replacement every 1-2 growing seasons as output declines (even when still lit, old fluorescent bulbs produce significantly less light).
If you already have a T5 setup that works, there’s no urgent reason to switch to LED. If you’re buying new, LED shop lights are the better value.
T8 Fluorescent
Standard T8 fluorescents (the kind in most offices and garages) work adequately for seed starting if hung very close to the plants—within 2-3 inches. Their output is lower than T5, so proximity matters. These are a reasonable budget option if you have a fixture already.
HID Lights (Not Recommended for Home Seed Starting)
High-intensity discharge lights (HPS, MH) are extremely powerful and used commercially and in serious indoor growing operations. For seed starting, they’re overkill: they run hot, use significant electricity, and require ballasts and specialized setups. Skip these for a home setup.
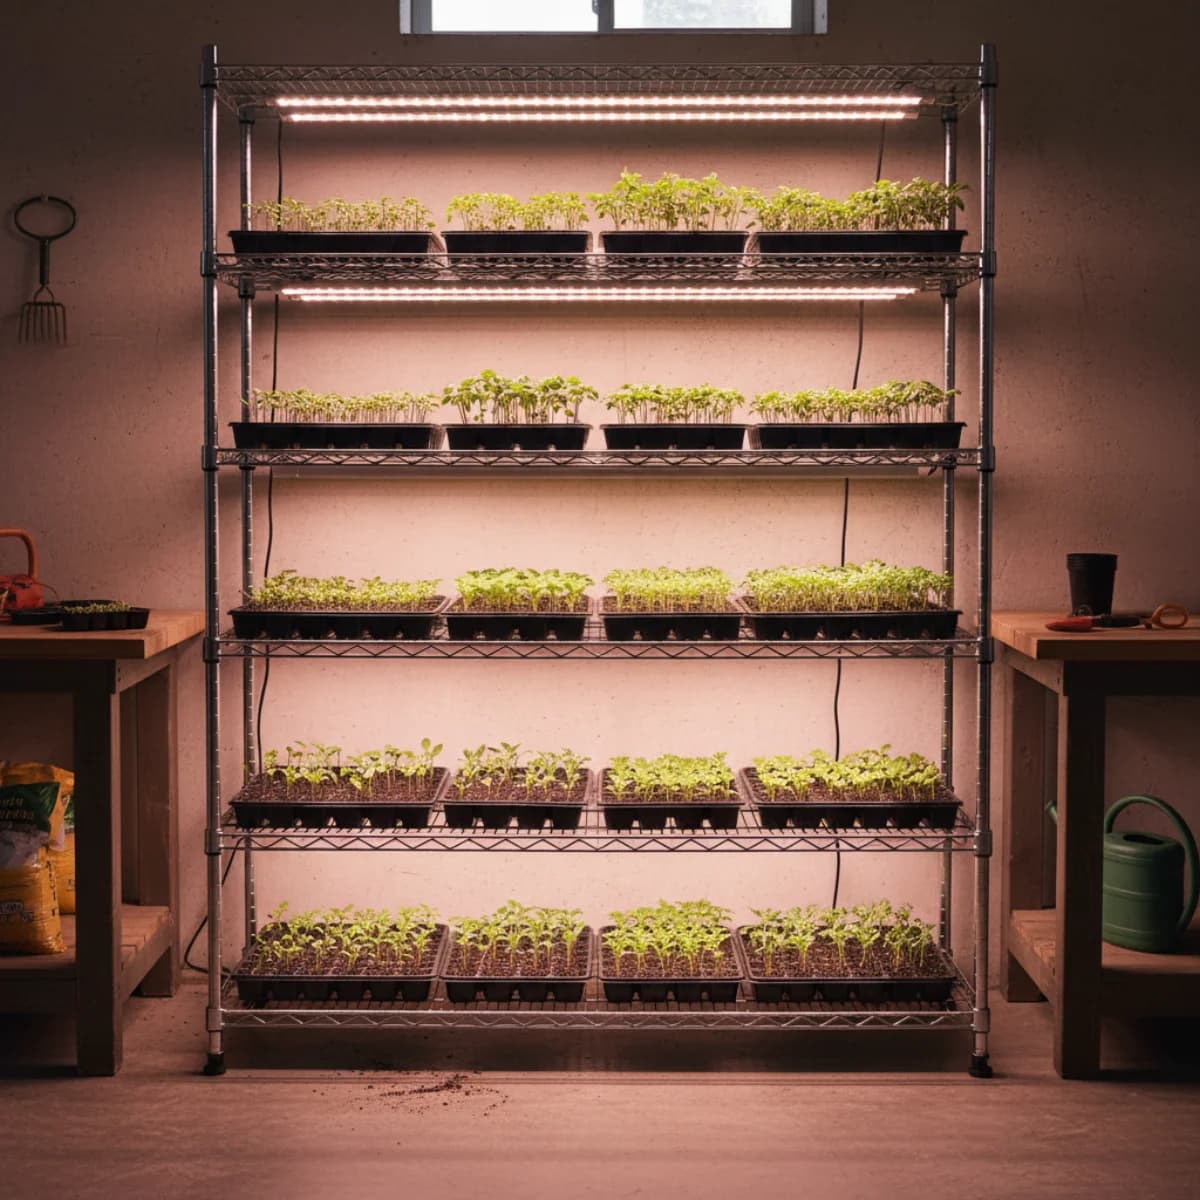
Setting Up Your Light Stand
The most common DIY setup uses wire shelving (Baker’s racks) with lights hung on each shelf. This gives you multiple growing levels in a small footprint.
Basic requirements:
- Wire shelving unit (typically 4-5 shelves, each 18-24 inches wide)
- LED shop lights or T5 fixtures (one 4-foot light per standard seed tray works; two per shelf is better)
- Hanging hardware (S-hooks, zip ties, or adjustable chains)
- Timer set to 16 hours on, 8 hours off
Light distance: This is the most important variable to get right.
With LED shop lights: hang 2-4 inches above seedlings for germination and early growth. Raise lights or lower trays as seedlings grow to maintain this distance.
With T5 or HO fluorescent: similar distance—2-4 inches for seedlings.
If lights are too far away, seedlings stretch toward them (etiolation—the classic leggy seedling problem). If too close with high-output lights, leaves may bleach or show heat stress. The right distance produces compact, dark green, robust plants.
Timer settings: 16 hours of light per day is the standard recommendation for seed starting. This simulates a long summer day. 14-18 hours all work; below 12-14 hours and seedlings begin to underperform.
The Most Common Mistakes
Hanging lights too high: The single most common problem. Seedlings reach for light they can’t quite get and grow tall, thin, and weak. Keep lights within 4 inches of seedling tops for most setups.
Buying expensive lights when basic ones work: A $25 shop light does nearly as well as a $150 “grow light” for seed starting. Don’t let equipment costs discourage you from starting.
Running lights for too long: 24 hours of light doesn’t produce better plants—most plants need a dark period. 16 hours is plenty.
Not adjusting light height as seedlings grow: As trays fill with taller seedlings, either raise the light or lower the shelf. Maintain the 2-4 inch distance throughout the seedling period.
Electricity and Cost
Running four LED shop lights (each drawing 25-35 watts) for 16 hours per day costs roughly $5-8 per month in electricity (at average US rates). A whole-season seed-starting operation—February through May—runs $20-35 in electricity for a typical home setup.
This is well below the cost of buying transplants at a garden center, especially for specialty or heritage varieties that aren’t available as transplants at all.
When to Start
Set up your light stand in January, before you need it. Test the timer and check that everything works. The first seeds to go under lights in most climates are onions and leeks (late January for Zone 6, later for colder zones)—having the setup ready means you’re not scrambling when timing matters.
Good lighting is the foundation of good seed starting. Everything else—soil mix, watering technique, fertilizing—matters less than getting the light right.
Sources & Further Reading
- Lighting for Indoor Plants and Starting Seeds — University of Minnesota Extension
- What Type of Grow Lights Should You Use for Starting Seeds? — University of Minnesota Extension
- Seed Starting — University of Wisconsin Horticulture Extension
- Artificial Lighting for Indoor Plants — Royal Horticultural Society